

Facebook Messenger
Integrating Facebook Messenger (FBM) with Webex Contact Center allows businesses to support their customers directly on one of the world's most widely used messaging platforms. In this guide, I'll walk you through the complete setup—from Facebook Page creation to flow configuration and end-to-end testing using and Webex Contact Center.
Objective
By the end of this guide, you'll be able to initiate a conversation from Facebook Messenger and receive it within Webex Contact Center's Agent Desktop. We'll walk through service setup, Messenger asset registration, flow creation, and testing.
Prerequisites
- Admin access to Webex Connect and Webex Control Hub
- A Facebook account. (if you have a Business Page then you can skip Step 1)
- Useful Links:
Step 1: Create a Facebook Business Page
Before integrating Facebook Messenger with Webex Contact Center, you need to have a Facebook Business Page. This page will serve as the customer-facing entry point for Messenger chats. Here's how to create it:
-
Go to the Facebook Page creation tool:
https://www.facebook.com/pages/create/ - Click on Create new profile or Page in the left sidebar: Choose Personal or Public.
- Click Get Started
-
Enter your Page details:
- Page Name: Use your company name or something identifiable like Acme Support.
- Category: Choose something relevant like Customer Service or Internet Company.
- Bio (optional): Add a short description of your Page.
- Click Create Page — your page is now live.
- Optionally add branding such as profile picture, cover photo, and description.
- Make sure the Page is Published under Settings > General.
- You must be an Admin on the page to complete Messenger integration.
Note: The steps above are for guidance as of the date of the guide. Facebook may have updated the UI and steps may vary. So refer to the latest Facebook page creation documentation for the most accurate steps.
Tip:
Once your Facebook Page is created and Messenger is enabled, you can allow customers to launch a Messenger chat directly from your website or campaign using the following link format:You can embed this link in a button, banner, or hyperlink, or even convert it to a QR code for use in presentations, kiosks, or printed materials.https://m.me/YourPageUsername
Add a QR Code to Launch Messenger
To generate a QR code that opens Messenger directly:
-
Copy your Messenger link:
https://m.me/YourPageUsername
- Go to a QR code generator such as qr-code-generator.com or qrstuff.com
- Paste the link, generate the QR code, and download the image
- Embed the image on your site or marketing material
You can also trigger this via a cross-launch button on your website, such as:
<a href="https://m.me/YourPageUsername" target="_blank">
  Chat with us on Messenger
</a>
This method is perfect for Contact Us pages, email footers, product support widgets, or even post-call surveys.
Step 2: Create and Register Facebook Messenger Asset in Webex Connect
- Log in to your Webex Connect instance (e.g., https://yourinstance.webexconnect.io/).
- You can log in from Webex Control Hub or directly from Webex Connect using the URL of your instance.
- Go to Assets > Apps > Configure New App and choose Messenger.
- Click Add Messenger Page and authenticate with your Facebook account.
- Select the page that you want to register on the What pages do you want to use with Webex Connect pop-up.
- Accept all default permissions, then click Save.
- Click Register to Webex Engage, choose the appropriate service, and click Register.
- Note down the Facebook Page ID (from m.me link) and the App ID (visible in the asset list).
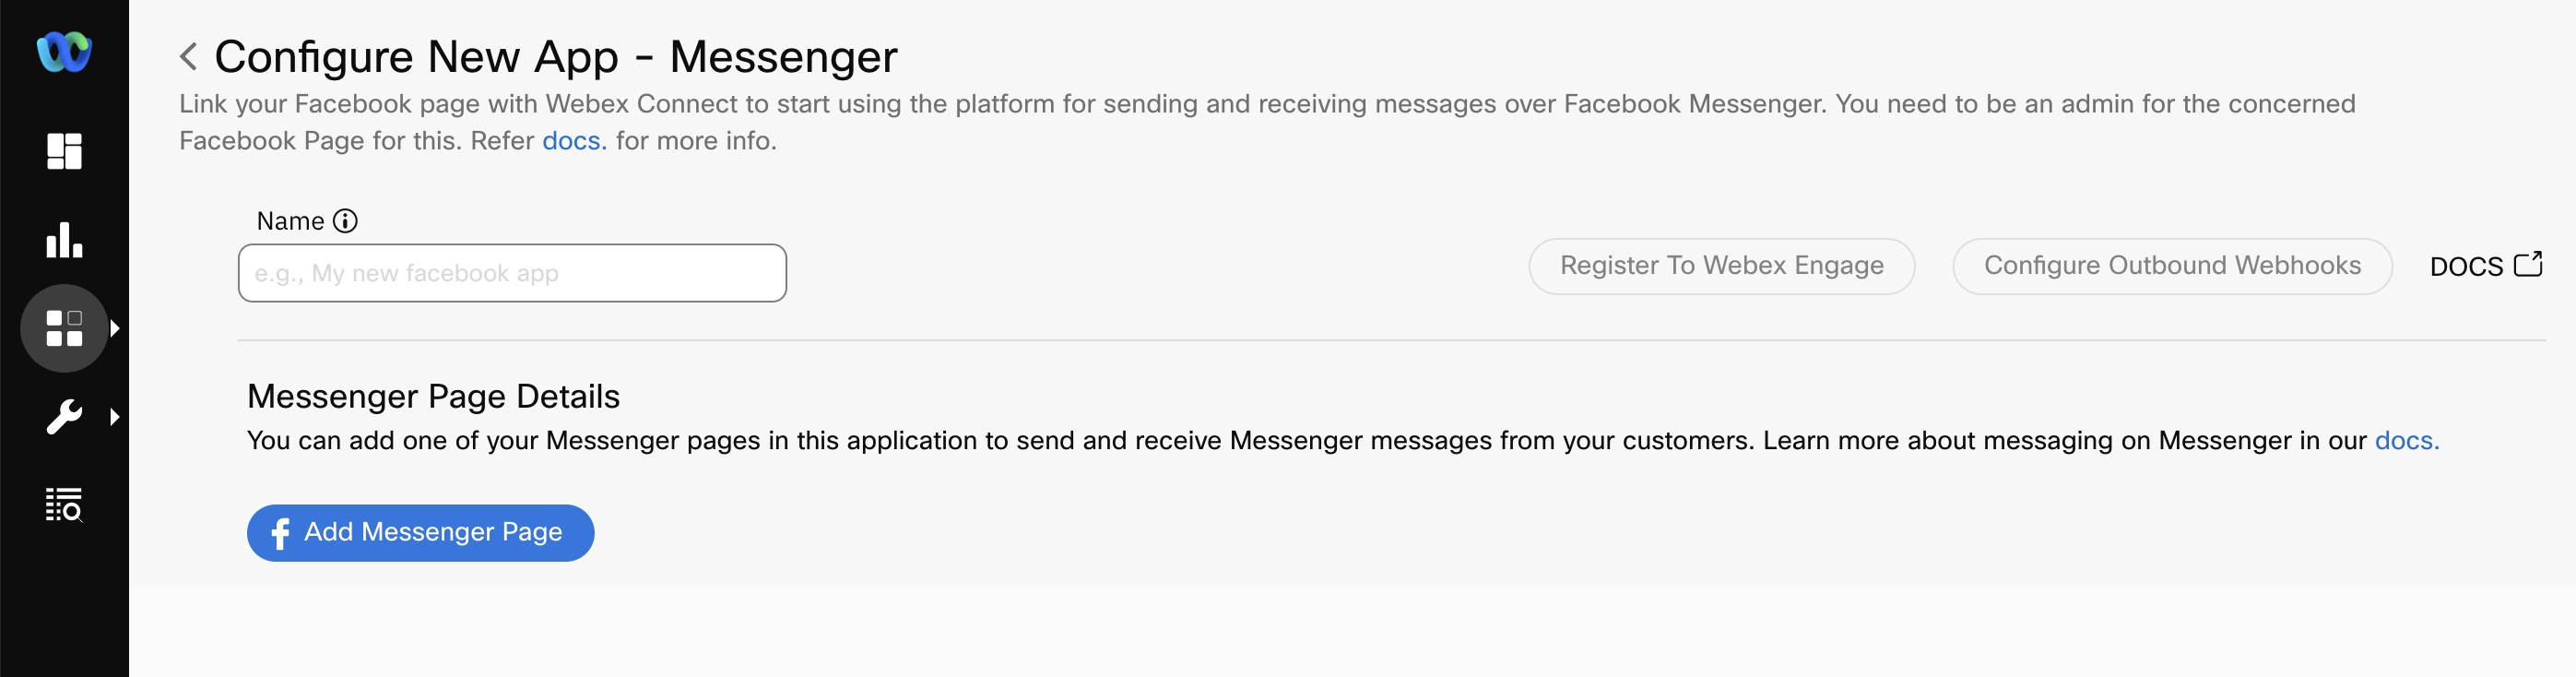
Figure: Create App
Note: You can always come back to the app page and note this down, don't fret!
Important:
Once registered, service mapping cannot be changed. Do not delete the Messenger asset after registration—doing so may break integration in Webex CC.
Step 3: Configure Channel and Queue in Webex Contact Center
Channel
- Login to Control Hub and navigate to Contact Center under Services section in the sidebar.
- Click on Channels under Customer Experience in the sidebar.
- Click on Create Channel.
- Input Name & Description as per your preference.
- Select Social in the Channel Type dropdown.
- Select Facebook Messenger in the Social Channel Type dropdown.
- Select the Messenger asset created earlier
- Click on Create to create the channel.
Figure: Create Channel
Queue
- Navigate to Queues under Customer Experience section in the sidebar.
- Click on Create Queue.
- Input Name & Description as per your preference.
- Select Inbound Queue from the dropdown for Queue Type.
- Select Social Channel in the Channel Type dropdown.
- Leave the Queue Routing Type to Longest Available Agent.
- Click on Create Group under Conversation Distribution and select your Team.
- Set Max Time in Queue: 300 seconds
- Select your preferred Time Zone.
- Click on Create to create the queue.
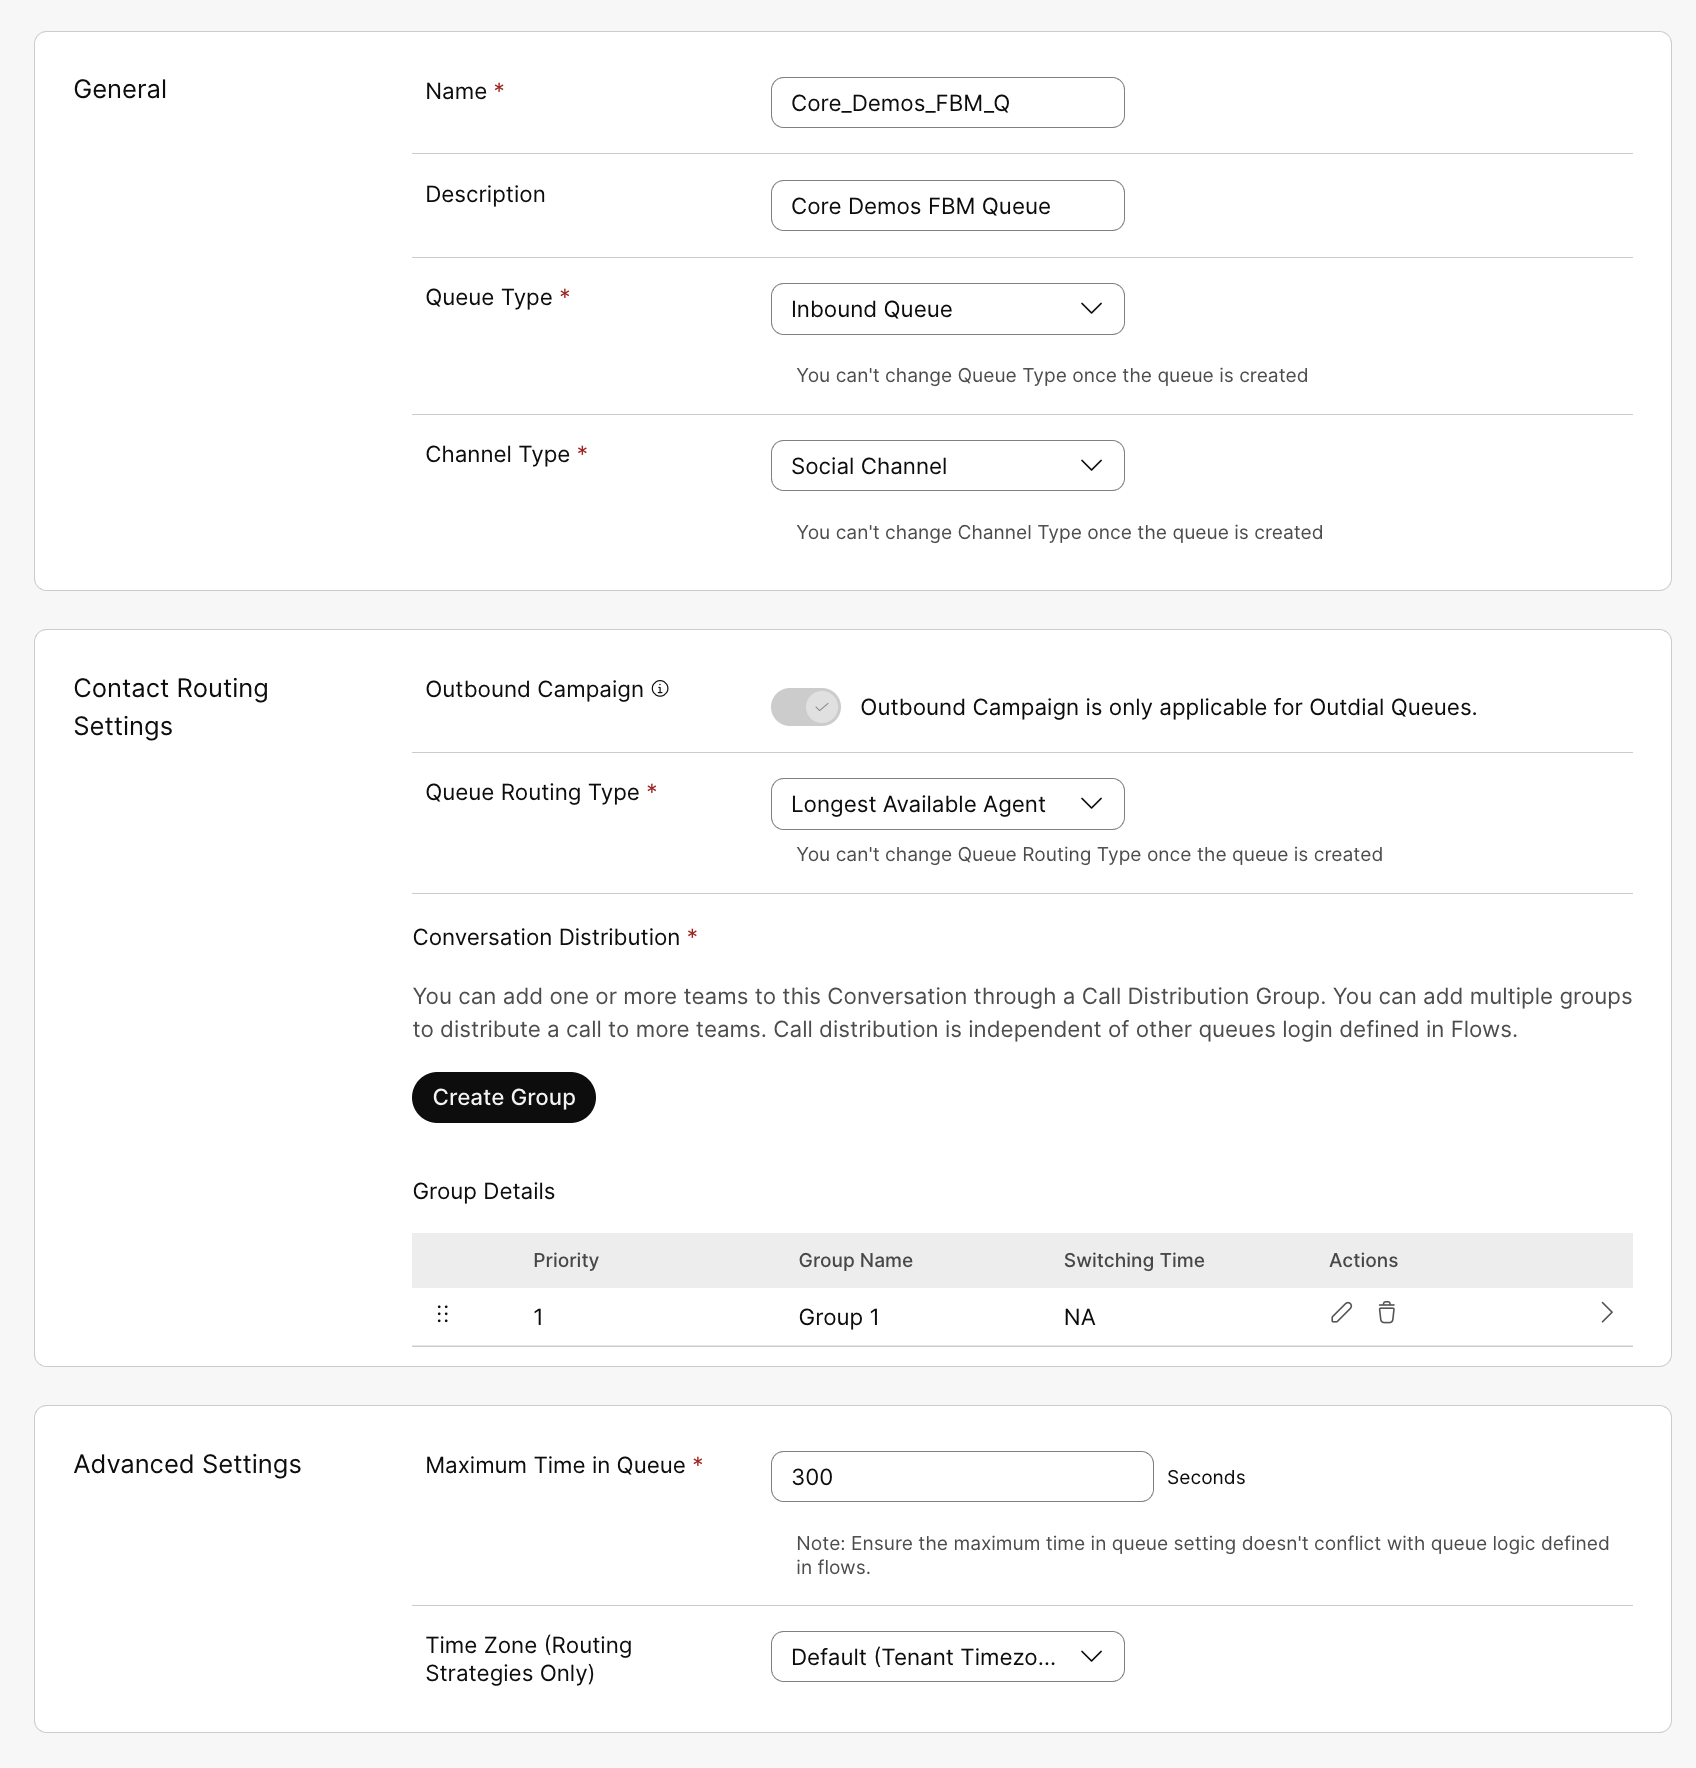
Figure: Create Queue
Step 4: Upload and Configure Facebook Messenger Flow
- Download the Messenger flow from the GitHub page .
- Navigate to Webex Connect Flows → v3.3 → Template → Media Specific → Workflows → FacebookInboundFlow.workflow.zip, click and select the zip file and download.
- Unzip the downloaded file.
- Go to Webex Connect, click on Services and select the service in which the Asset was created in Step 2.
- In the service, click View My Flows and Create Flow.
- Input your preferred name for the flow under Flow Name and select Upload a flow from the Method dropdown.
- Select the FacebookInboundFlow.workflow file and click on Create.
- In the Start node (App Event), click Save using default settings
-
Open flow settings, go to Custom Variables and
set:
- FBPageID: numeric ID from m.me link
- appid: Webex Connect App ID
- Edit the Queue Task node: set queue to FBM_Q
- Edit Resolve Conversation node: paste the flowId from browser URL
- Click Make Live and link to the asset created in Step 2.
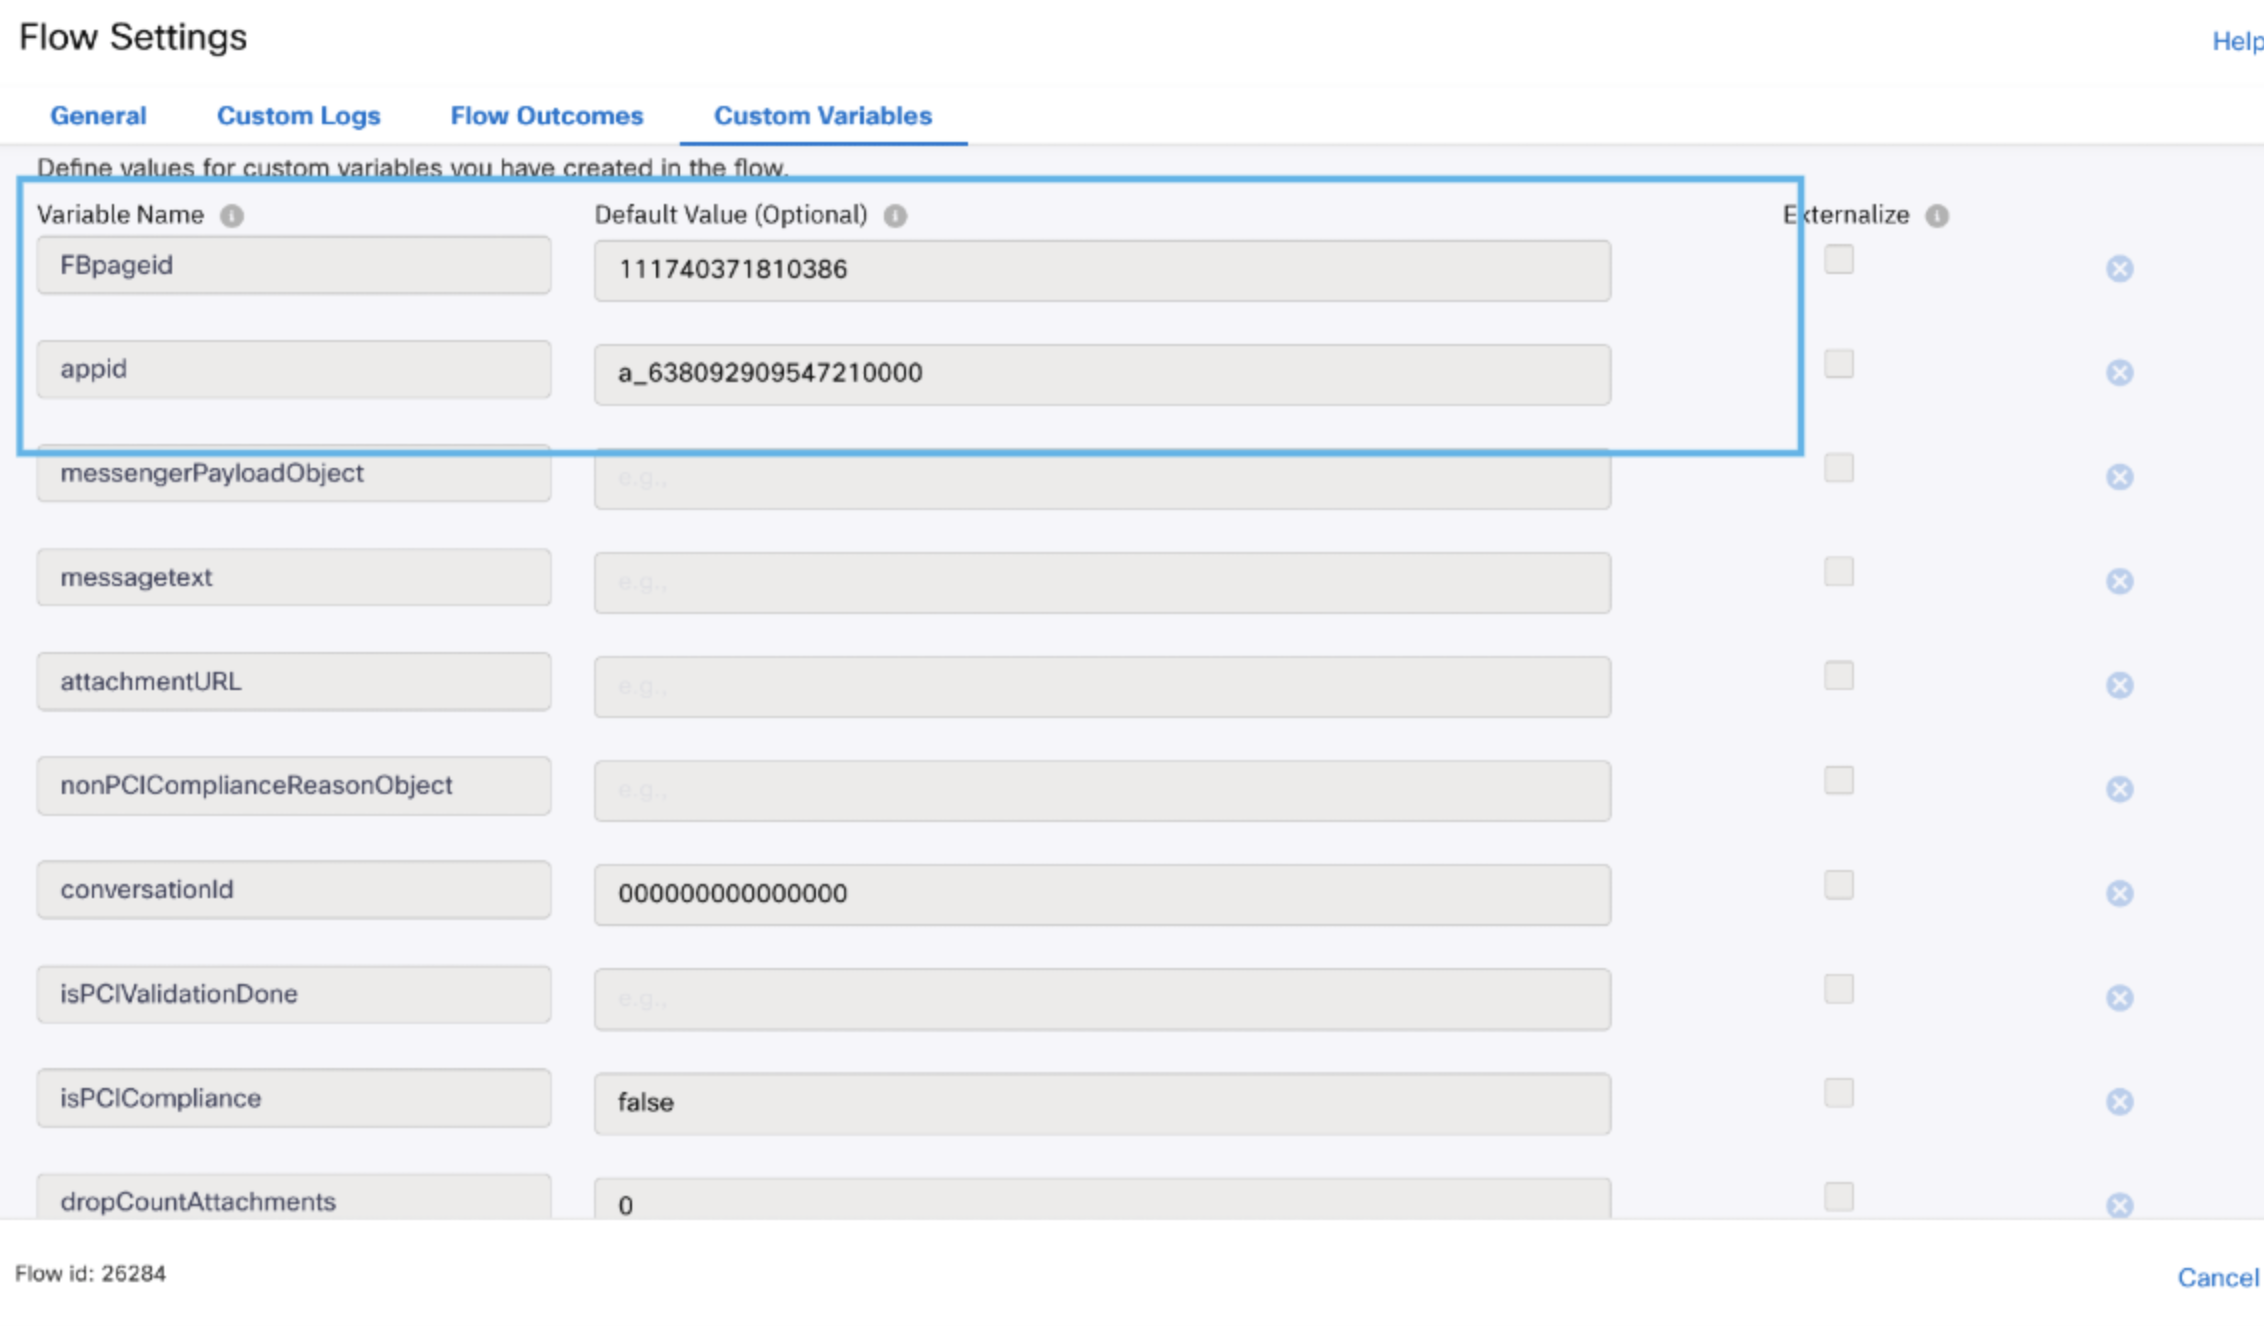
Figure: Custom Variables
Step 5: Verify End-to-End Chat
- Log into Webex CC Agent Desktop and set your status to Available
- Open your facebook messenger page from the m.me link
- Send a message as a customer from Messenger
- Accept the contact in Agent Desktop and respond
- Close the task and add wrap-up
Advanced Configuration (Optional)
Welcome Screen
You can configure a welcome message for Messenger users. Enable it via the Messenger App settings in Webex Connect.
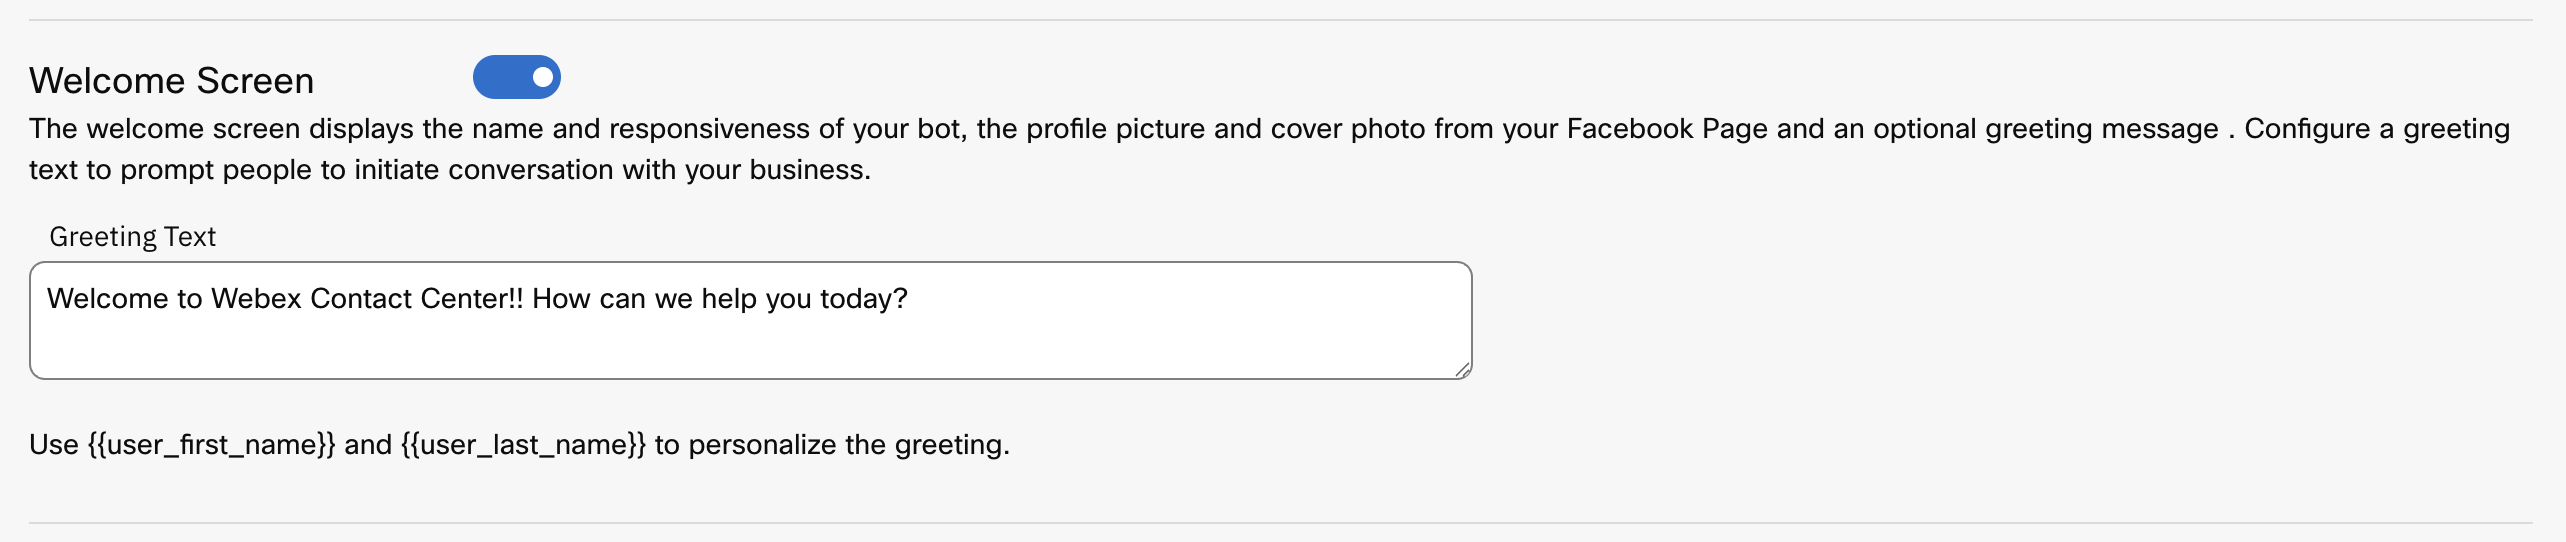
Figure: Welcome Message Configuration
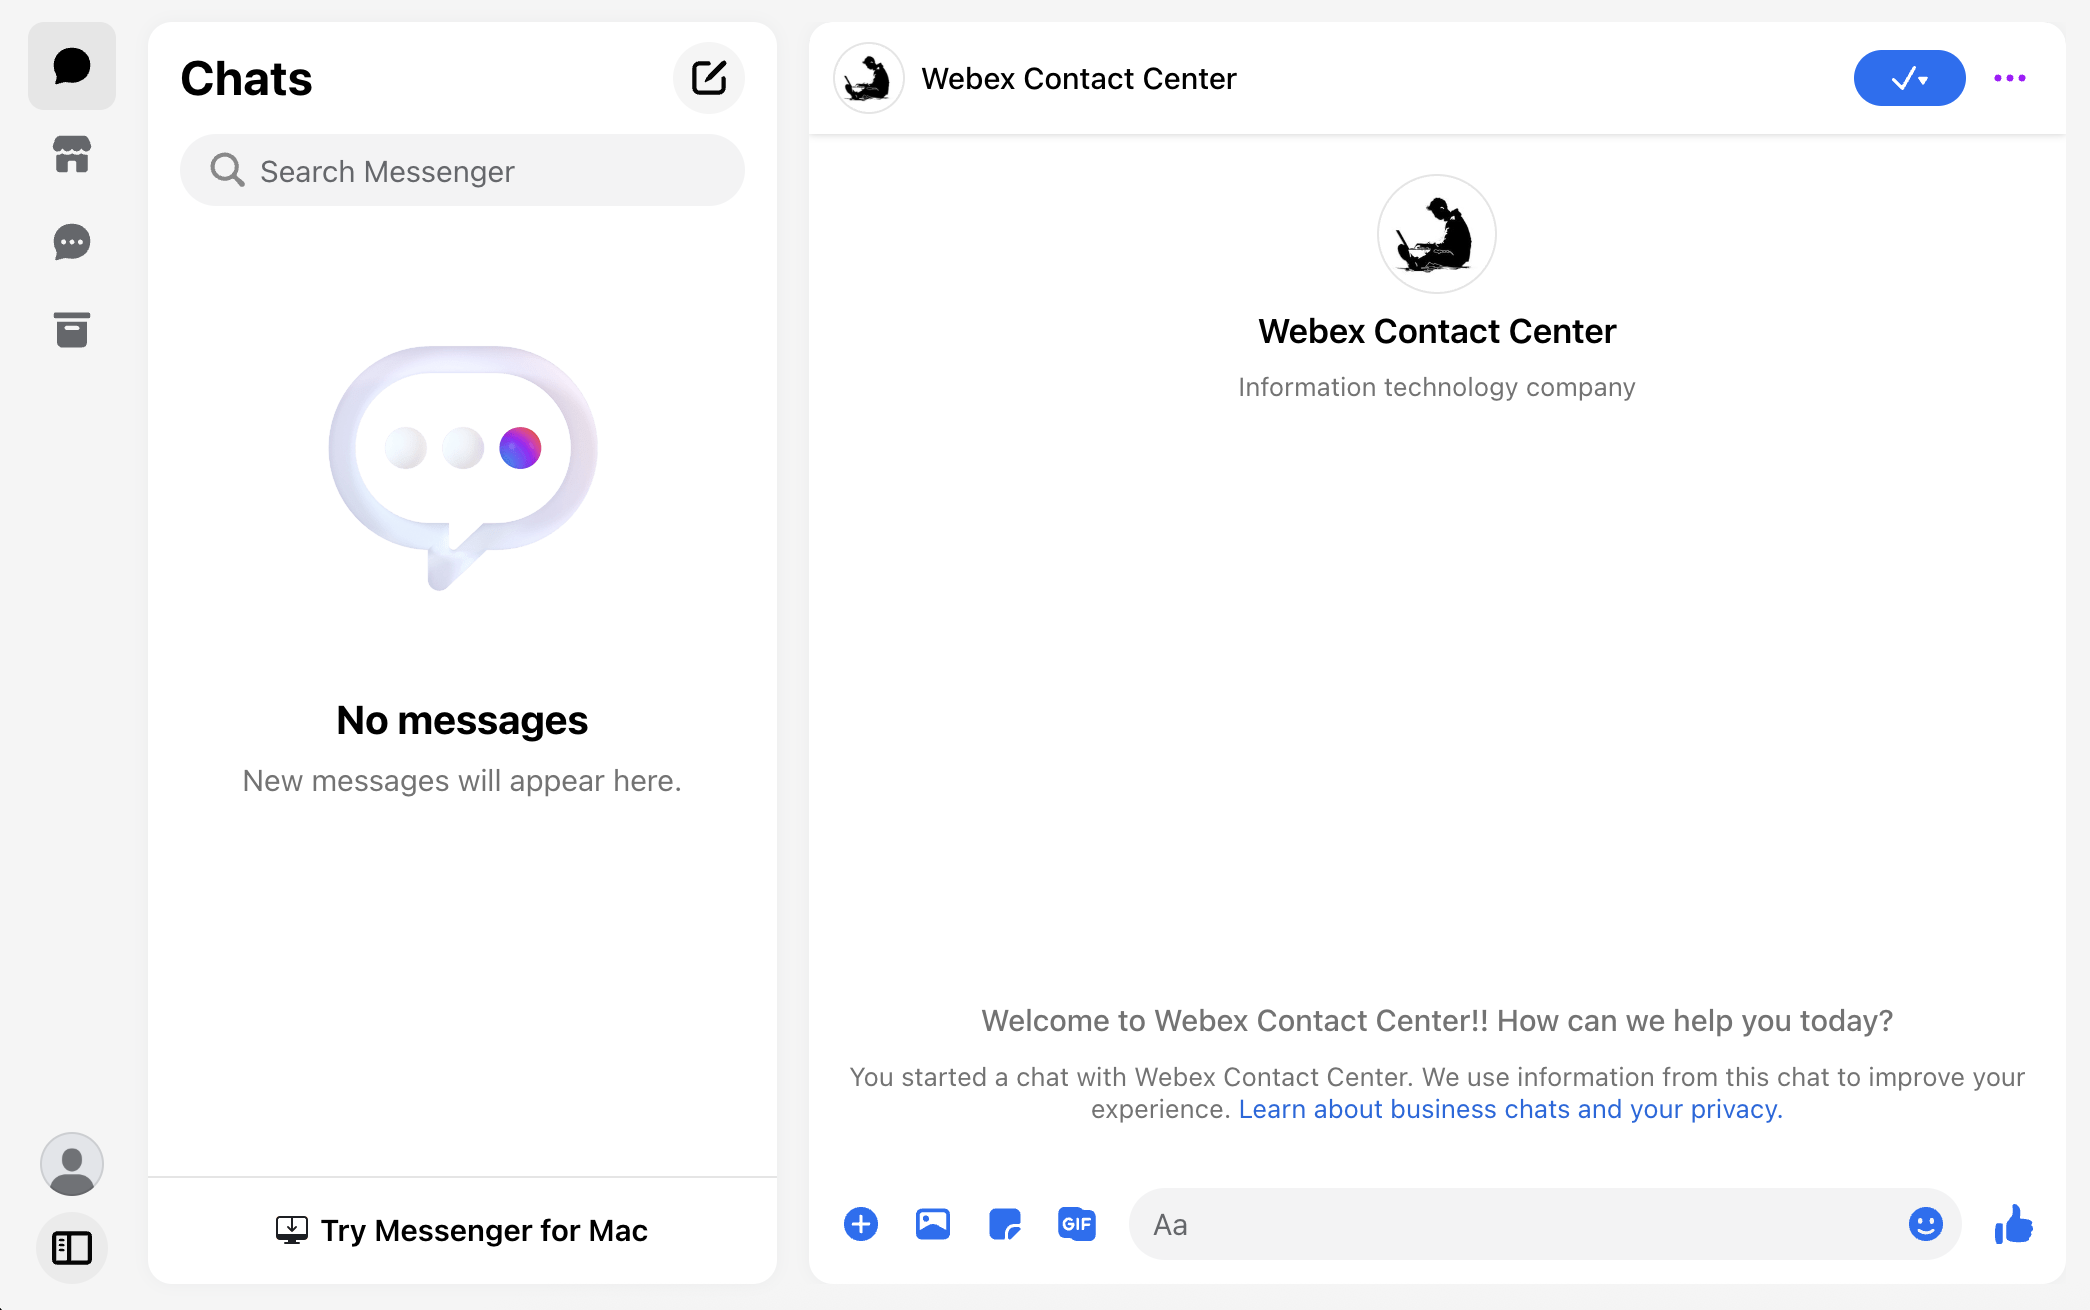
Figure: Welcome Message in Messenger
Persistent Menu
- Persistent Menu is an always-visible menu in Messenger.
- You can create the following button types: Open URL, Postback
- Postbacks trigger events in the Webex Connect flow.
- When a Messenger user clicks an item in the menu, a postback event notification is received as part of inbound notifications like in start node, receive node and outbound webhooks. The event notification contains information about what item was select and by whom. This item selection action opens the standard messaging window wherein the Business has 24 hours to respond to the Messenger user.
- You have the option to disable free text input if you want to enforce structured conversation options.
- You need to enable the Get Started button in the Messenger App settings in Webex Connect to activate the persistent menu.
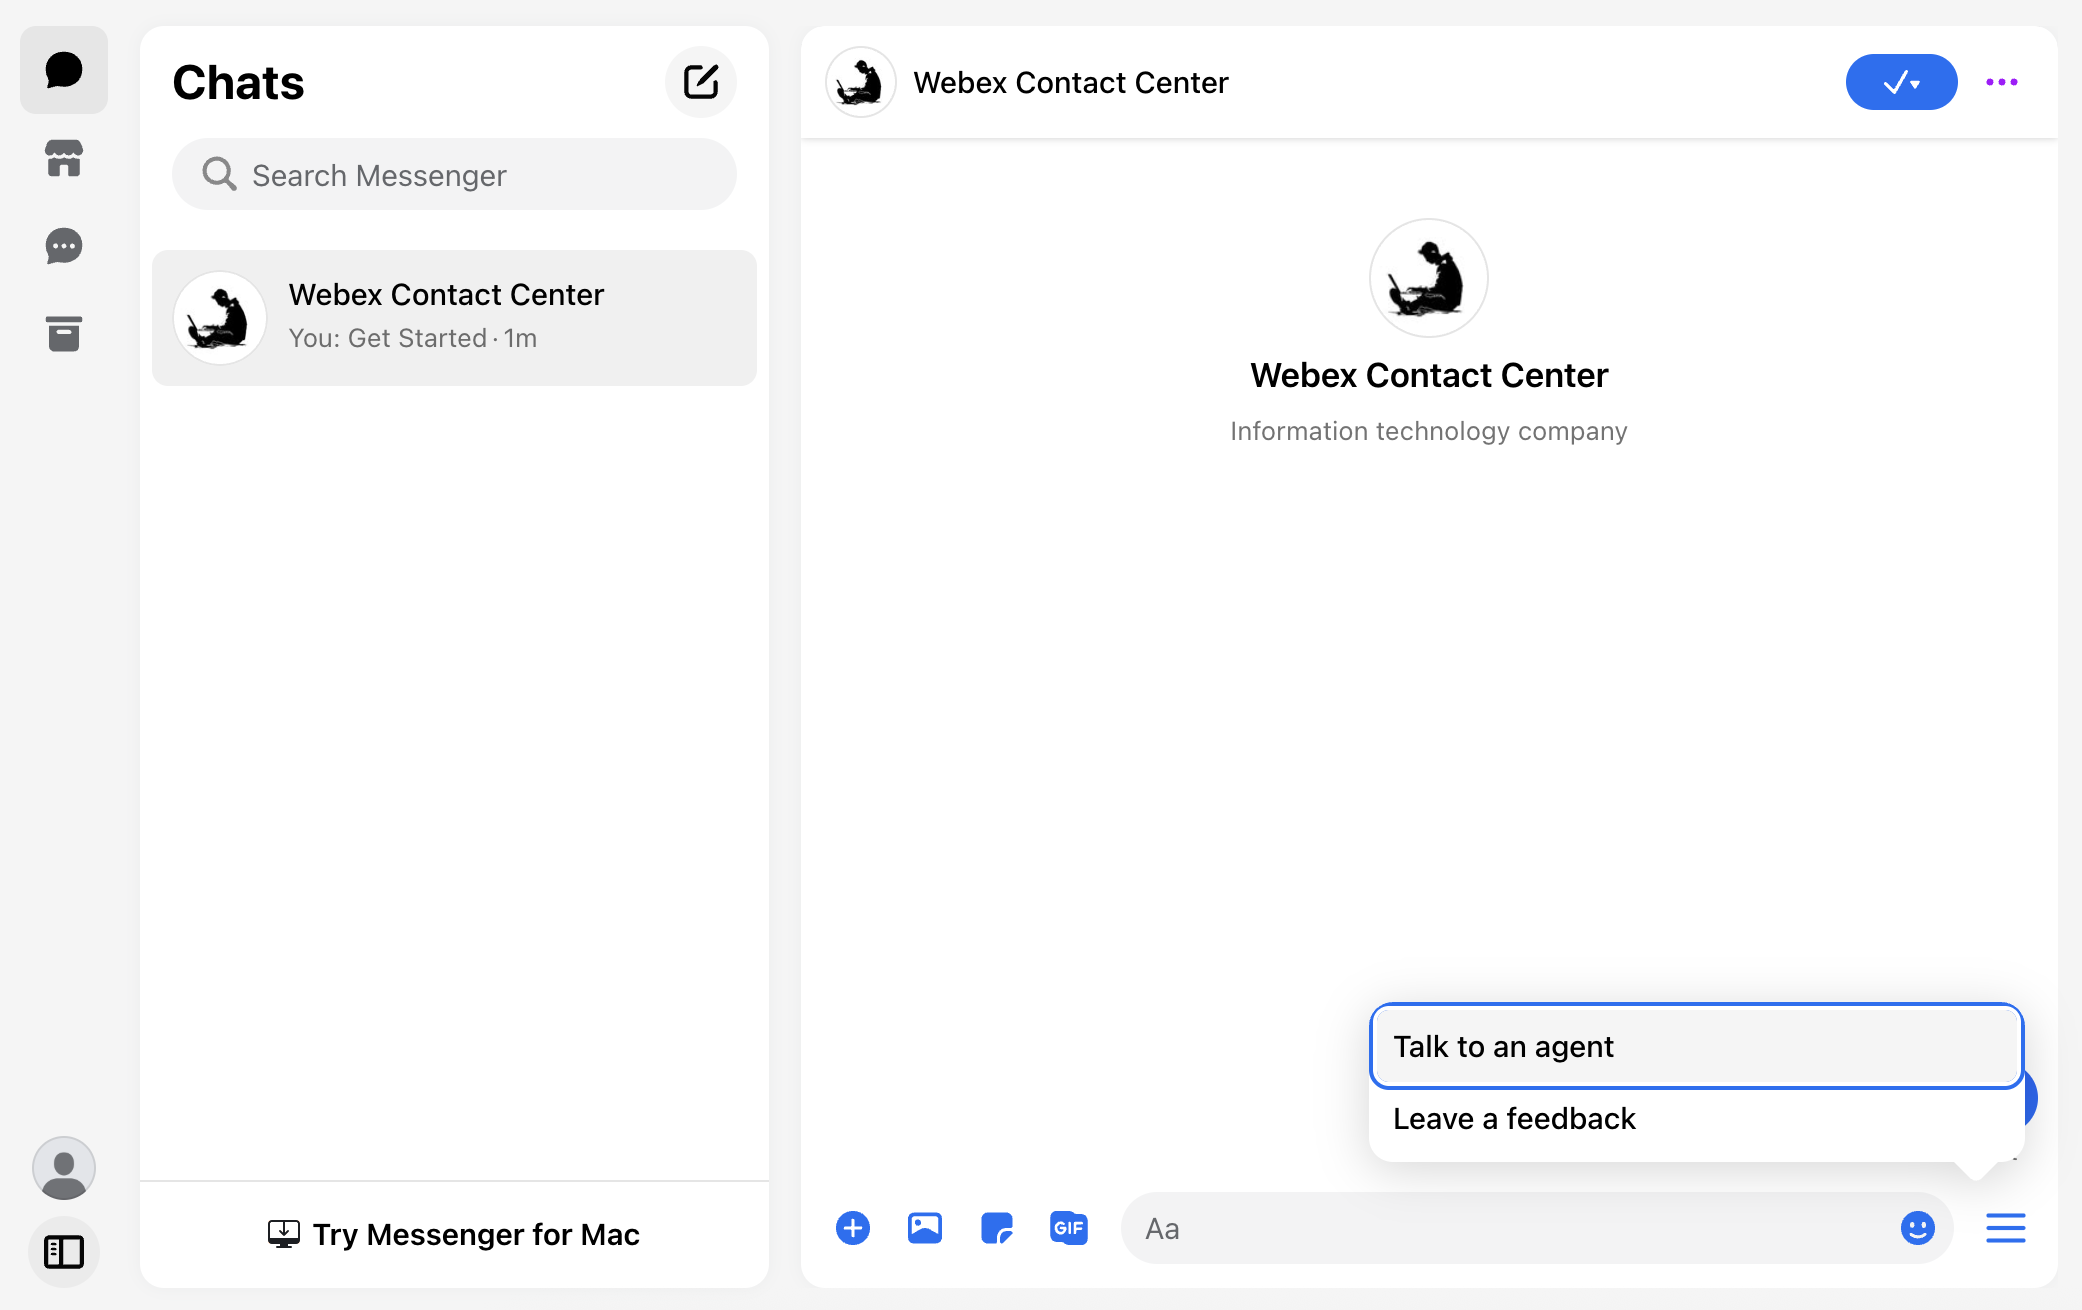
Figure: Persistent Menu
Allowed List Domains
Set allowed domains in the Messenger asset for links and webviews to work properly in chat.
Messenger Plugins for Websites
The Page Discovery plugins allow you to integrate the Facebook Messenger chat experience directly onto a website/webpage for a personalized experience. You can configure a Message Us button to redirect the users to Facebook Messenger and open a conversation within your page. To use the plugin, you should include the code snippet provided on asset configuration page along with Facebook's JavaScript SDK. The website domain must also be in the allowed list on which you wish to use this plugin.
Troubleshooting Tips
-
Messenger authorization may expire if:
- Password is changed
- Admin loses access to the page
- You exclude previously integrated pages during re-auth
- Don't delete the Messenger asset once registered
- Service mapping cannot be changed after registration
Conclusion
You've now completed an end-to-end Facebook Messenger integration with Webex Contact Center. With flows in place, agents can receive and respond to customer chats directly from their Agent Desktop. Next, explore advanced workflows, sentiment analysis, or CRM integration to deepen your customer experience capabilities.